Video to prompt is the workflow of watching a finished video and turning it back into the words that likely created it. Instead of guessing from a blank page, you start from what you can already see: camera movement, subject action, lighting, pacing, and visual tone. That is useful when you want to learn prompt structure, recreate a style, or build a new variation from a reference clip.
This guide shows how to reverse engineer AI video prompts from any video without overcomplicating the process. The goal is not to recover every hidden parameter. The goal is to produce a prompt that captures the important creative choices well enough to recreate the look in Veo, Kling, or Seedance.
What Is Video to Prompt?
Video to prompt is different from image to prompt because motion is the main thing you are decoding. You are not only asking "what does it look like?" You are also asking "how does it move, and in what order do the changes happen?" That means a good video to prompt workflow pays attention to timing, camera behavior, and scene progression.
The easiest way to think about it is this: a strong reverse-engineered prompt usually has three layers. Layer one is the subject. Layer two is the motion. Layer three is the visual style. Once you separate those layers, the prompt becomes much easier to write and much easier to edit later.
Step-by-Step: How to Reverse Engineer a Video Prompt
1. Capture the main subject
Start by naming the thing the viewer should remember first. It might be a person, a product, a room, a pet, or a landscape. If you skip this step, the rest of the prompt can still sound polished, but it will not have a clear anchor.
For example, "a bride standing near the window" is more useful than "an elegant scene." The first phrase gives the model a subject. The second gives it a vibe. You usually need both.
2. Describe the camera movement
Next, write down the motion in plain language. Is the camera pushing in, pulling back, panning left, following the subject, or staying locked off? If the shot feels smooth, note that. If it feels energetic, note that too.
This is the part that most people miss when they try video to prompt by hand. A still image can be summarized with only objects and colors. A video needs motion language because the model has to know how the scene changes over time.
3. Note the scene and lighting
After motion, record the environment. Is the scene indoors or outdoors? Is the light warm, cool, natural, moody, or studio-like? Are there reflections, haze, neon, shadows, or window light? These cues often explain why the clip feels cinematic.
Lighting is especially important because it controls mood without adding extra action. A simple subject under soft golden hour light can feel far more polished than a more complex subject in flat light.
4. Decide what should stay stable
If the clip keeps the face, outfit, or product shape consistent, say so. That is a major part of reverse engineering. A lot of people focus only on movement and forget that the best prompts also protect identity and composition.
This is where the prompt starts to look like a real production note. You are not only describing motion. You are telling the model what must not drift while the motion happens.
5. Combine the pieces into one prompt
Once you have subject, motion, scene, and stability cues, combine them into a short prompt. Do not keep every observation if some of them do not help the shot. A clean prompt is easier to reuse than a perfect transcript.
The final prompt should read like a usable instruction, not a diary entry. If you can paste it into a model and know what kind of result you should get, it is probably good enough.
Example: From Video to Prompt
Imagine a short clip of a model walking through a city at blue hour. The camera follows from behind, then slowly reveals her face as neon signs glow around the street. You can reverse engineer that video into a prompt like this:
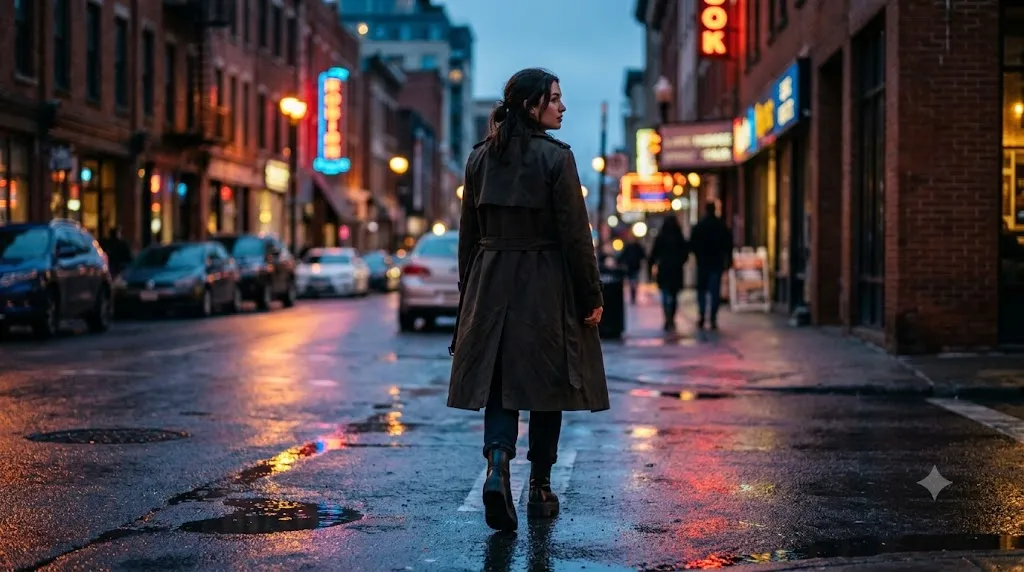
Create a 6-second cinematic city video. A young woman walks through a neon-lit street at blue hour, wearing a long dark coat and moving at an even pace. Camera movement: smooth follow shot that slowly reveals her face from behind. Lighting: cool dusk sky with warm neon reflections. Style: polished urban realism, stable face, natural motion, shallow depth of field.That prompt does not copy every possible detail from the clip. It captures the parts that matter most: subject, motion, atmosphere, and visual style. That is usually enough to recreate the feel of the original video or build a new variation from it.
Frame Analysis Example
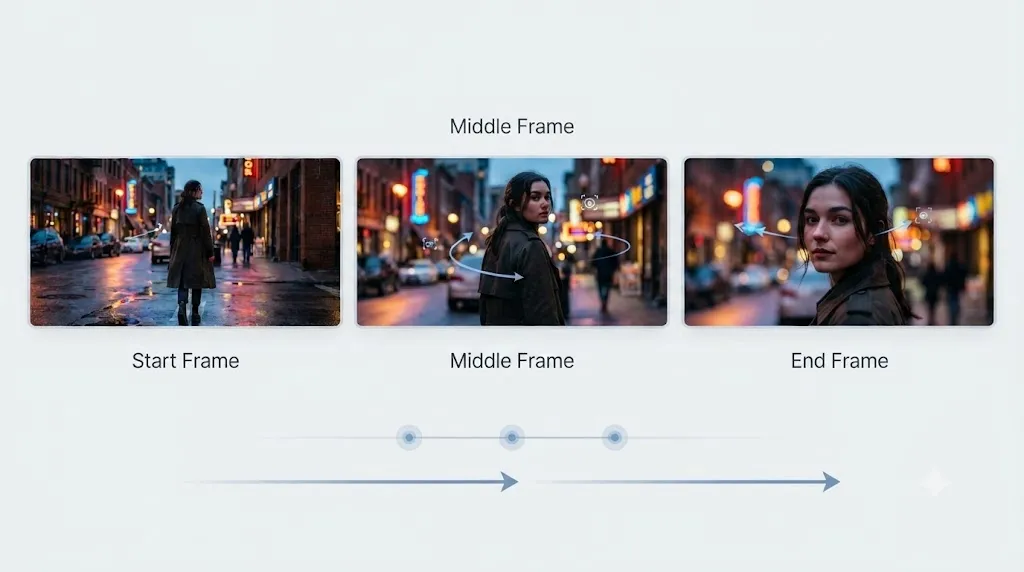
Use the frame sequence to separate the source video into three decisions: what the first frame shows, what changes in the middle, and what the final frame should preserve. That keeps the reverse-engineered prompt visual instead of turning the page into a long list of text prompts.
For portraits, focus on face stability, hair motion, and camera distance. For products, focus on object shape, material detail, and camera orbit. For story clips, focus on the beginning state, the emotional change, and the final composition.
Tools That Can Help
The fastest workflow is usually a mix of manual observation and prompt generation. First, watch the clip and note the main subject, the motion, and the light. Then use AI Video Prompt Generator to turn that rough structure into a clean prompt. If you already know the target model, jump straight to Veo Prompt Generator, Kling Prompt Generator, or Seedance Prompt Generator.
If you are working from a still frame instead of a full clip, the Image to Prompt tool is the better starting point. Video to prompt is about motion. Image to prompt is about the visual stillness that sits underneath the motion. The two workflows are related, but they do not ask the model the same question.
Common Mistakes
One common mistake is trying to describe every single frame. That makes the prompt too long and usually less useful. Another mistake is ignoring lighting and composition. A third is forgetting to say what should stay stable, especially when the subject has a face that needs to remain recognizable.
Another mistake is copying the style words without understanding the motion. "Cinematic" is not a motion instruction. "Slow push-in," "locked-off shot," or "gentle follow shot" are motion instructions. The more precise your language is, the easier it becomes to reproduce the clip in another model.
Conclusion
Video to prompt is a practical skill, not a magic trick. Once you learn to separate subject, motion, scene, and stability, the process becomes surprisingly repeatable. You stop guessing and start reconstructing.
Use the examples above as a working structure, then adjust the final prompt for your own subject, model, and scene.